Question:Flash curing slows me down. Is there any way to eliminate it?
Almost all flash curing can be eliminated from standard, day-to-day printing. And yes, you are right, flash curing severely reduces productivity and profitability. The typical screen printer says he or she can print 100-120 one-color shirts per hour when the ink is dark and the shirt is light. When printing colors on dark shirts, such as white ink on a black shirt, those same screen printers say they produce about 30 per hour. That's a productivity difference of 300-400 percent. Huge.
People printing low numbers such as 30 per hour are typically printing, flashing, and printing again. In addition to low productivity, this process incurs other risks. A flash “cure” should be until the ink does not pick up on your finger, but may be slightly tacky and certainly will be malleable. That usually takes six to eight seconds, but most people leave the garment under the flash dryer until the next garment has been printed and is ready to be flashed—significantly longer; it will take an excess of 30 seconds to load and print a one-color shirt.
On jobs where ink is being printed and flashed, the first color down will be fully cured after the flash time totals 60 seconds; inks are typically fully cured after 60 seconds. Thus, on multiple-color jobs, the third and subsequent colors will not bond to prior-printed colors that have been fully cured. When multiple layers of white ink are printed on a black shirt, the top layers might also not bond for the same reason. The shirt will look great leaving the plant, but will crack and fade from repeated washings.
Controlling the variables
The purpose when printing on dark garments is to block the color of the garment. The ink film needs to lay on top of the shirt and be opaque to block the shirt color. How do we accomplish this? The answer is one word: control. Actually, we need to control a number of printing variables. If we can control these variables, we can eliminate flash curing in most cases.
The first variable is screen tension. The mesh needs to be very tight and be just as tight at the end of the job—even if that is the 300th shirt printed. If mesh is not tight, even the most adept screen printer will drive ink into the garment allowing the color of the garment to show through the ink film. The problem will be greatest in the center of the screen where the mesh deflects more than out by the sides of the frame where there is more support.
The diameter of mesh threads varies with mesh count. A 110 mesh might be 80 microns in diameter and a 305 mesh might be 35 microns. The greater physical size of 80 microns allows stretching mesh to a higher tension than 35 microns. Also, the larger physical size will hold tension better. Regardless, all mesh will relax and lose tension.
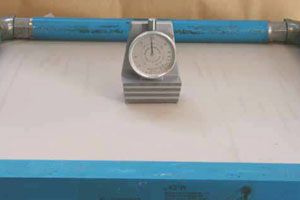
The first variable the author recommends bringing under control in your quest to eliminate or reduce flash curing is that of screen tension. And the most practical way to accomplish that is with retensionable frames.
After the first tension the loss will probably be in the 25 percent range. Wait two or more hours, and apply more tension to exceed the prior tension level, and the tension will decline another 15 percent. Repeat the process and the next day the tension will drop another five percent or more. Each time we print we deflect the mesh on each print stroke, and that causes mesh to lose tension. You might have noticed that new screens are not as tight at the end of a job as they were at the beginning of the job.
If mesh has been re-tensioned after each job, and the total prints from the various jobs exceeds 500, then we might have obtained work-hardened status. Mesh is work hardened when it is as tight at the end of the job as it was at the beginning, within no more than one or two Newtons/cm2. Any frame—wood, aluminum or steel— that does not provide for the mesh to be re-tensioned will not allow white ink to be printed on black shirts without flash curing. So, the first variable is retensionable frames and mesh that becomes work hardened.
Stencil and Ink
The second variable is the use of capillary film. The film is applied against the mesh forming a two-ply structure where the ink passes around the threads and through the film stencil, and the ink-deposit thickness is determined by the film thickness. This is fundamentally different from liquid emulsion which is in the mesh. When applying capillary film, only water is used, and the film should not be squeegeed into the mesh. Even multiple coatings of liquid emulsion will not produce the uniform and precision coating thickness of capillary film.
Next, we need an opaque ink. Inks are made with different percentages of pigment. A process ink, for example, has the lowest percentage, being transparent. Fourcolor process works best on white garments, because you can see the garment through the ink film, and the garment color becomes one of the final colors. An opaque ink has, by contrast, a high pigment percentage so that the garment color is completely blocked.
Opaque inks are often stiff or taffy-like and, therefore, more difficult to print. The remedies are vigorous stirring, and blending with up to 20 percent of a medium-pigmented ink of the same color. Do not add more than two or three drops of curable reducer per screen to improve shear. Most people add reducer as if they were making the witch’s brew. But they are merely converting an ink to a soupy status. Ink will then pass easily through the screen, but also settle into the garment rather than stand up on the surface. So avoid curable reducer if at all possible, and add only a few drops— which must be thoroughly mixed in—to help the ink shear from the screen.
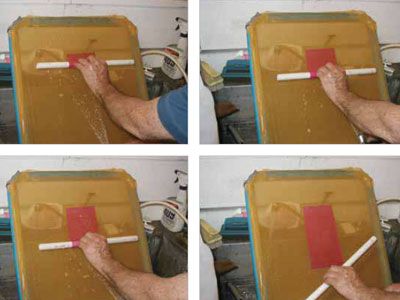
The author is a big believer in capillary ilm for stencil making. This series shows a sheet of ilm being rolled down the mesh, while a stream of fresh water is aimed up the mesh.
Different strokes
Of course, the squeegee must have a sharp edge to cut the ink film cleanly. We sharpen, or I should say, polish our blades before each and every print run. The barber polishes his razor on a leather strop before shaving each and every customer, because a sharp blade works better. Dull blades will not hold the ink-film thickness we need for opacity.
One of the most important variables is squeegee pressure. When printing, the blade should never bend. All we want to do is to close the off-contact distance—between the screen and the shirt—which will typically be one to three 32nds of an inch. If the blade bends, that means there is back pressure from the platen, and the ink is being splattered rather than cut to the specific dimension of your stencil’s image. Look at some screen-printed CDs under magnification and you will note some have splattered images. That spreads the ink to a larger dimension and the ink-film thickness and opacity are reduced.
An all-cotton shirt is easier to print than a blended one, because there is a tooth to the surface that will anchor the ink film being transferred from the screen to the shirt. That anchor will hold the ink to the shirt when the tight mesh snaps off the shirt as the squeegee passes over the image area. The capillary film is very smooth and slick and only touches the ink at the edge of the image. Similarly, the polyester mesh is also slick. So the cotton fibers will pull the ink out of the screen. The challenge is to pull the ink out of the screen without also driving the ink down into the shirt.
A stiff blade such as a 75-95-75 is easier to control than a medium hardness such as 70 durometer. An aluminum handle is better than wood for this application because the handle compresses the blade its entire length rather than at points where there are bolts to hold it in the wood handle.
Most printers know that the angle of the squeegee blade to the mesh affects the amount of ink deposited. A lower or more acute angle will deflect more ink down through the mesh and on to the garment. For manual printing, we find that the optimal angle is 40-45 degrees. The angle can be measured with a 25 cent plastic protractor from eighth-grade math class. Just don’t rotate your wrists when printing, and be very sensitive to locking your wrists at the optimal angle.
Speed of the print stroke is also important. A faster stroke moves more ink across the screen rather than depositing the ink onto the garment. So to print white ink on black shirts without flash curing, the stroke speed should be slower than normal. A good way to produce a consistently slower speed is to set the squeegee angle and pressure, then step back holding the squeegee rather than pulling the arms back. The movement will be slower and more consistent.
One pass of the squeegee
One of the simplest steps a screen printer can take is to set up using eighth-inch Plexiglas on the platen. The screens should be checked for flatness before being coated with stencil. Plate glass such as that on the exposure unit is typically flat, but should be checked with a metal straight edge to make sure there is no bow to the glass. The flat screen is put in the press and brought down on top of the Plexiglas sheet which has been placed on the platen. The color arm of the press needs to be resting on the off-contact bolt. If a press has more than one registration gate, then all off-contact bolts must be set at exactly the same height.
The platen should be checked for flatness also. Just run a straight edge over the platen front to back and side to side looking for space between the straight edge and platen where light shows through. Excessive heat on platens from flash curing will warp them in time. To print without flash curing, we must have flat platens. Of course the platen cannot move when printing, or the thickness of the ink film will change.
When the flat screen comes down on the sheet of Plexiglas and flat platen, touch the mesh at the four corners of the platen. Does the mesh give, or is the mesh solidly on-contact? Most likely, the first time you apply this test to the press the revelation will be that the press is out of calibration. Once apparently adjusted, remove the Plexiglas and bring the screen down to the press. The color arm of the press should rest on the off-contact bolt before the screen touches the platen. Touch the mesh again in the four corners. Does the mesh appear to deflect the same amount regardless of where you push down on the mesh? Does the deflection appear to be one-eighth inch? If not, more work adjusting the press will be required.
The one problem when printing with retensionable frames is the mesh is so tight that when you push down with the squeegee the mesh will make the aluminum frame bow down and the ink will not release properly from the screen. If this is the case, use a box cutter to cut a piece of cardboard about 3” X 3” and use packing tape to hold the cardboard to the neck of the platen. You could, instead, tape the cardboard to the bottom of the screen. The object is to support the frame so only the mesh deflects. More ink will be released by using the cardboard, and the image will be more opaque.
If a screen or platen is warped, the off-contact distance will vary across the screen, and the amount of ink transferred to the shirt will be inconsistent. We want to control that transfer and pre-determine the exact amount of ink that is deposited on the shirt.

A sheet of Plexiglas used as a spacer between the platen and lowered screen is the author’s favorite way—and a very practical approach—to calibrate consistent off-contact distance.

If squeegee pressure is causing the “free” end of the screen frame to bow downward during its stroke, an easy fix is adding a cardboard (or other material) shim to the “free” end of the shirtboard.
As you see, there are many variables to control the exact transfer of ink to lay on top of a garment, and the requirement to flash and print again depends on how well we can block the garment color using one pass of the squeegee.
Reprinted from Printwear Magazine September 2008 ©2008 National Business Media, Inc. All rights reserved.