Screen printing stands as a versatile and impactful medium, enabling the creation of custom-designed T-shirts that can exude both personal flair and your brand. Whether you're a hobbyist seeking a creative outlet, aiming to launch an apparel business, or see a new for screen printing in your local area, creative screen printing is a way to express your imagination and start a business. It is an art form that empowers you to translate your visions onto fabric, transforming plain tees into wearable expressions of artistry, while also providing a commercially viable business.
This step-by-step guide demystifies starting to screen printing for yourself by breaking down the screen print process so you can see how the innovation and technique of screen print. It's more than just a craft; it's an avenue for self-expression and a gateway to turning passion into tangible, awe-inspiring designs. This step by step guide will go over each part of the screen printing process in detail so that by the time you’ve finished reading you’ll have all of the tools necessary to get started on your creative expression!
Step 1: Gather Your Materials
To begin, you'll need:
Just hyperlink products here, instead of the list below. Or both. Makes for more concise reading.
- Screen Printing Frames: Choose a frame suitable for your project size. Look for a standard sizes, such as 20” x 24” OD or 23” x 31” OD, to help keep costs down. For printing T- shirts by hand, 20” x 24” is the most popular option in the industry.
- Screen Printing Ink: Look for high quality inks for better prints. Getting a low-cure ink that dries around 285 helps prevent your shirt from burning and means you can dry quicker. This is especially important if you are going to use a flash unit or a small conveyor dryer at home.
- Squeegee: A necessary item for printing. There are different stiffness squeegees (called durometers). If you are just starting, get a 70 Durometer squeegee as these are the most versatile.
- Emulsion and Emulsion Remover: Used to create stencils on the screen and clean it afterward.
- Light Source: Using an exposure unit is the best way to create your stencil. This is especially true if you want halftones and fine lines.
- Designs and Transparencies: Create or print your designs on transparencies for exposing.
- T-shirts: Use high-quality blank tees for better printing results.
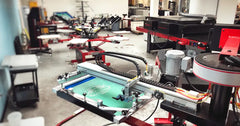
Step 2: Preparing Your Workspace
Preparing your workspace for screen printing is crucial for a smooth and efficient process. Working in a well-ventilated area with ample space to move around comfortably is best. Screen printing can be a messy process so make sure to wear clothes you don’t mind getting dirty. Organize your tools and materials in a way that they're easily reachable and keep the area well-lit to aid in precision during the printing process. A clean and organized workspace not only enhances your efficiency but also contributes to the quality of your prints.
Step 3: Creating the Stencil
- Coat the Screen: Apply emulsion evenly on the screen and let it dry in a dark environment until dry. This typically takes anywhere from 20 minutes to overnight, depending on where and how you store your screen. It is very important to make sure the emulsion is fully dry before exposing it.
- Expose Your Design: Place your transparency with the design on the coated screen and expose it to light. This will harden the emulsion except where your design blocks the light.
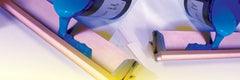
- Wash Out the Design: Rinse the screen with water to wash away the unhardened emulsion, revealing your image. The ink will go through the open screen mesh onto your shirt.
Step 4: Printing
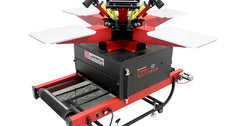
- Set Up Your T-shirt: Lay your T-shirt flat on your platen (also called a pallet) and secure it in place using either an aerosol or liquid adhesive.
- Position the Screen: Place your screen over the shirt, ensuring the design aligns correctly.
- Apply Ink: Using the squeegee, “flood” the screen by lifting the screen up so it is not in contact with the shirt and put an even coat of ink covering the entire image area. Next, put the screen down on top of the shirt and push hard with the squeegee to drive the ink through the screen and onto the shirt.
- Repeat: Lift the screen and check your print. Repeat the process for each shirt, adjusting the ink and pressure as needed.
Step 5: Curing the Print
Curing your prints is the vital last step in ensuring their durability and longevity. Curing plastisol screen printing ink involves using a conveyor dryer at the specified temperature and duration. It is possible to use a flash unit but drying the ink will be very slow and you have to be care not to burn the shirt. No matter which option you use to cure shirts, heat must be used. T-shirt ink will not air dry. To make curing your shirts easier, look for a low-cure ink, such as Multi-Tech’s Dynamic Ink Series. A low cure ink cures around 285 degrees (instead of the typical 320 degrees). Low cure inks require less heat, which means they dry quicker and easier, especially if you are just starting to screen print.
Step 6: Clean-Up
After completing a screen printing session, it's best to tidy up your workspace diligently. Begin by carefully storing any leftover ink in airtight containers to maximize the shelf life. You can save and reuse any ink left on your screen by scooping it back into your bucket. Follow this by cleaning your squeegees and screens thoroughly with an ink degradent, like ID-360. Follow this by applying a stencil remover, like SR-45, onto your screens and pressure wash the emulsion away.
Wipe down your work surfaces, removing any ink splatters or spills, and organize your tools and equipment back into their designated storage areas. Properly dispose of any disposable materials, such as used paper towels or gloves, in accordance with local waste disposal guidelines. A clean and organized workspace not only preserves your equipment but also sets you up for success in your next screen printing endeavor.
Recommended Products from Lawson Screen & Digital Products
Screen printing, like any craft, thrives on practice. Embracing the learning curve is key; it's where innovation and expertise converge. Those initial hurdles? They're the stepping stones to mastery. So, dive into experimentation with varied inks, diverse fabrics, and unconventional designs. Try tweaking pressure, angle, or even the consistency of the ink for different effects.
Every mistake is a lesson, every adjustment a step toward finesse. Beyond technique, relish the creative freedom screen printing offers. Let loose with bold colors, intricate patterns, or imaginative motifs. Make each print session an adventure, a playground of artistic exploration. Remember, the joy in screen printing isn’t just in the final product, but in the journey of discovery and creativity along the way.