Screen printing on jackets and feleeces are a popular demand. Learn how to print across their zippers.
How to Screen Print Shirts with Buttons and Zippers
Getting a good screen printed result can be tricky, but here are some tips and tricks for printing over raised areas on tee shirts, hoodies, fleeces and other raised substrates that Lawson has learned over 70+ years of screen printing. For example, many popular hoodies and fleece garments feature a zippered front or a front pocket where a screen printed logo might go.
Tip #1: Divide Your Artwork Most screen printing artwork runs horizontally, from left to right, across a shirt. You will want artwork that has a gap that equals the width of the zipper. If possible you can separate, or divide, your artwork when creating it in CorelDraw or Photoshop. By modifying your screen printing artwork on the computer, it helps keep your image straight when exposing your film positive onto your emulsion coated frame.
Another way to move your artwork around the zipper is by physically cutting your artwork in half after having printed the transparency on the silk screen frame. You would place each half of the artwork on your screen, leaving room for where the zipper, button, or other raised area would be on your garment. Once you get on-press with your screen printing frame, make sure to align the garment’s zipper with the gap in your artwork.
A note about artwork: “distressed” graphics can be good for printing over zippers. By nature, they look imperfect, which helps hide screen printing issues.
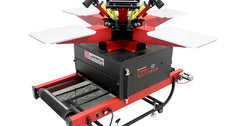
Tip #2: Have a Zipper Platen for your Manual or Automatic Screen Printing Press Another way to screen print over a zipper, or other raised objects, is to make a special platen board to print on. Cut-out, or route a platen that the zipper and/or seam will sit in. When you print, make sure your zipper sits in the groove so the printing surface is flat. This will help produce an even, solid print.
If you do not want to cut into a platen, an alternative is to build up either side of where the platen will be. This is easily done with a thicker material, like platen rubber. Mount the rubber on either side of where the zipper will fall. This will create a channel for the hoodie, or fleece garment zipper or seam (basically the reverse of cutting out the groove). If you build up your platen, make sure to check your off-contact printing. You may need to raise it up so you still get a sharp looking screen print.
No matter which way you make your zipper pallet, your goal is to create a flat printing surface with the hoodie or fleece sweatshirt. Making your custom platen can be combined with the artwork tip as well.
Tip #3: Test, Test & Test Always make sure to pre-test. You don’t want the first time you screen print over zippers to be the garments you have to send out to a customer. A little testing, trial, and error can save you big time down the road.